Quest to Upgrade Laptop (Part 3): Setting up Dual Boot
Dual-booting is the practice of having two operating systems on one computer. Usually, people switch from Windows loader (BCD) to the freer GRUB. Installing Linux after Windows will switch to GRUB loader.
Windows Clean Install #
I was surprised at how fast the computer runs after a clean OS wipe. It seems that it’s easy to accumulate a lot of junk on a computer, even though I manage my files carefully.
Before I get boot-happy… #
…switch the Fn and F# keys in the BIOS. I prefer to use a key by its name, and not by the “Multimedia” feature that’s different for every manufacturer.
Limitations #
Initially, I wanted to keep Windows and Linux on separate drives, but it wouldn’t work. Due to my insufficient knowledge on how laptops work, I spent a long time trying to achieve the impossible.
The XPS 15 9560 is hardcoded to only read from the NVMe SSD on initial boot. This is probably a design tradeoff so that manufacturers can easily configure variations of the XPS model. The extra drive slot only mounts after the OS loads.
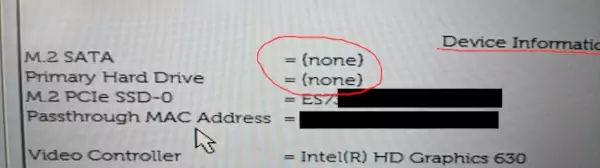
In Dell BIOS Settings > General > System Information > Device Information the harddrive slots are empty even though I installed a Samsung EVO 870, which means the BIOS stage is too early to recognize it.
Several layers of software has to be preloaded before the concept of a partition even comes up. See Bootloader Wikipedia diagram and BIOS Boot partition sequence.
If you want to dual—or even triple—boot on an XPS 15, all OSes must be on the NVMe. This affects how I can allocate the partitions.
Partition Tables #
In the end, I decided to split the sectors and mix files from each OS. Disk 1 will have both Windows and Linux OS. Disk 2 will be for media files and everyday stuff.
Windows Disk Manager #
Keep the manufacturer’s Recovery and Boot Manager partitions.
The table rows listed from top-down are Purpose, Size, Format, Mount Path
💽 Disk 1: NVMe (256 GB) #
| Boot Manager | Windows OS | Recovery Partitions | Unallocated |
|---|---|---|---|
| 524 MB | 121 GB | Various; adds up to 14 GB | 120 GB |
| EFI (FAT) | NFTS | N/A | N/A |
| N/A | C:/ | N/A | N/A |
- Shrink Windows Drive
C:in half (or however much you want to allocate to Windows). In my case, it was114688MiB (112 GiB). Follow any guide available, like the one For Dummies.
❗ If the manager won’t let you shrink, or the available space shows less than what exists, disable immovable files.
- An unallocated space remains. Linux will go here later.
💽 Disk 2: SATA (2 TB) #
- Right-click the unallocated space and select Create Simple Volume.
- Go through the Wizard, create an NFTS with 500 GB and any drive letter. I chose
S:for Samsung.
| Windows Personal Files | Unallocated |
|---|---|
| 500 GB | 1.5 TB |
| NFTS | N/A |
S:/ | N/A |
Install Linux from USB #
I prefer restarting my computer, plugging in the USB and mashing F12 to the BIOS screen, then selecting the USB stick, but you can do it from Windows Advanced Boot too.
Every Linux OS installer will let you fill in the unallocated partitions. Typically it is good practice to have one partition for OS files mounted at / and another for all the personal files mounted at /home.
While creating the partition table, format it as GPT, not MBR.
💽 Disk 1 #
Where it says “free space” it should be filled in with one partition.
| Linux OS |
|---|
| 120 GB |
| ext4 |
/ |
💽 Disk 2 #
“free space” can be filled with a home partition, and an optional swap partition.
| Linux Personal files | Swap (optional) |
|---|---|
| 1.5 TB | 2 GB |
| ext4 | swap |
/home | N/A |
📤 Swap Partition
If you’re using Ubuntu versions 19+, you don’t need a swap partition and can go without it (source). For a distro like Manjaro, you’ll have to set up aswappartition that’s about 2 GB to 100% of your RAM (if you have 16 GB of RAM, the recommended size of the swap partition can be any amount from 2-16 GB). It is best to stick with 2 GB unless you have special computing needs (like extremely CPU-heavy rendering).
End result (Ubuntu) #
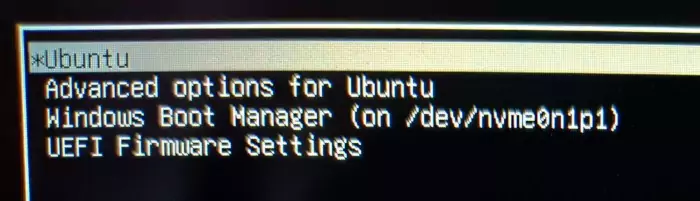
When booting, I get a GRUB menu which lets me choose between Ubuntu and Windows.
The text is really tiny. You can customize GRUB’s font but I’m too lazy, so we’ll just use a lower resolution.
Larger text (lower resolution) #
In /etc/default/grub uncomment the line GRUB_GFXMODE=640x480:
# you can see them in real GRUB with the command `vbeinfo'
GRUB_GFXMODE=640x480
Apply changes by running:
sudo update-grubWhen you restart the bootloader should take up the whole screen.
Conclusion #
Dual-booting an OS is tricky. It took a good weekend to setup because of limitations in the hardware that I found out the hard way.
Out of the box, the Ubuntu desktop experience takes time to get used to if you’re like me who’s used Windows my whole life. I have to install additional programs like gnome-tweaks and extensions such as ArcMenu and Dash-to-Panel to mimic funcionality that’s included in Windows (such as clicking on an open program in the task bar to minimize it). The default Ubuntu GNOME desktop is very pretty, but I don’t particularly care for MacOS aesthetic.
If you’ve installed video game mods before, this process is pretty similar to that. Otherwise if you’re like me who’s suspicious of having too many package managers, I installed the extensions manually. Here’s a guide on how to install GNOME extensions through a variety of methods.
As someone who likes to collect a lot of tools and process a lot of data, I am excited to have a box that comes with first-class support for CLI utilites. Actually, it’s amazing I can install almost anything by opening a terminal and copy-pasting some lines. Since I was already installing stuff manually on Windows, I’d have the same workflow for the most part.
Windows sadly will still be needed for Adobe and Microsoft Office, as their market reach is extremely broad. Open source alternatives like Krita are amazing for artists, and GIMP is awesome for all but the most intense Photoshop superusers. There are also many free video editors that give Premiere a run for its money. However, Inkscape and Scribus don’t come close to Adobe Illustrator and InDesign.
Well, this is the end of my upgrading efforts. Let’s 🤞 I won’t need to take apart this computer for another 5 years, other than to clean the fans.