How to create an online textbook
Inspired by Creating Open-Access Web-Based Textbooks with GitHub, this guide is meant to be an easy and hands-off experience with publishing a textbook to the web, for free. It will let you practice sustainable authorship, expose you to static site generators, and try Git as a collaborative tool.
💡 At the end of this tutorial, you will have an online textbook that looks like:
The theme is generated by mdBook, and it comes with PDF print output.
How long does it take to publish a book? #
10-30 minutes, if you know what you’re doing. This is contigent on two things:
Assuming that you adopt the authoring workflow of plain text (such as Markdown), and you’re willing to share knowledge for free, publishing takes 10 minutes. No joke.
Obviously, this time estimate doesn’t include the hard parts: writing the book, marketing the book, and providing value to an audience.
My advice to young writers is to ignore dead trees publishers of all kinds. You don’t need a publisher to reach your audience. A Web server and worth-of-mouth is all that you need to reach an audience of 50 million. The time and effort that you put into schmoozing agents, editors, and publishers could be better spent practicing your craft.
—Philip Greenspun, “Why I’m not a Writer”
Set up a repository for your book #
A repository is a place to store files related to a project. In this case, your textbook project can be stored on GitHub’s servers.
Create an account at GitHub.
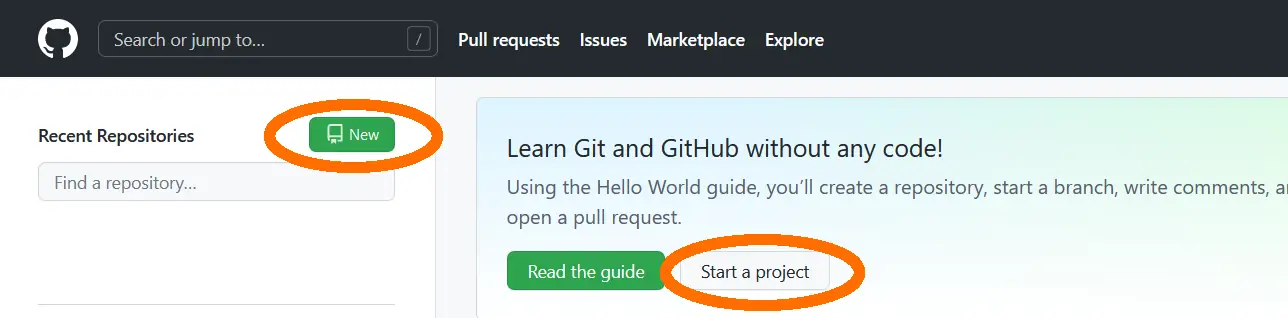
On the homepage, click on the New button on the left side, or the Start a project button under the beginner’s announcement for “Learn Git and GitHub”.
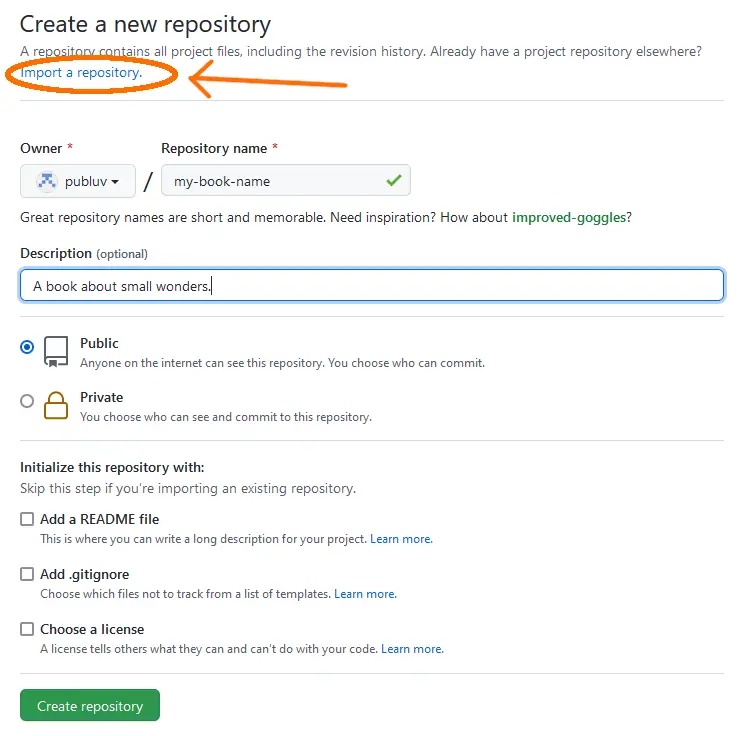
If you already have an empty repository that exists, scroll down to the bottom of the screen and click the Import code button.
Fill out repository details.
- For the old repository clone URL, use
https://github.com/publuv/textbook.git - Enter any name for your project.
- Set the repository to Public.
- You may set it to Private, but GitHub’s service will have a monthly limit. See billing for GitHub Actions for details.
- Click on Begin Import and wait for it to finish.
- For the old repository clone URL, use
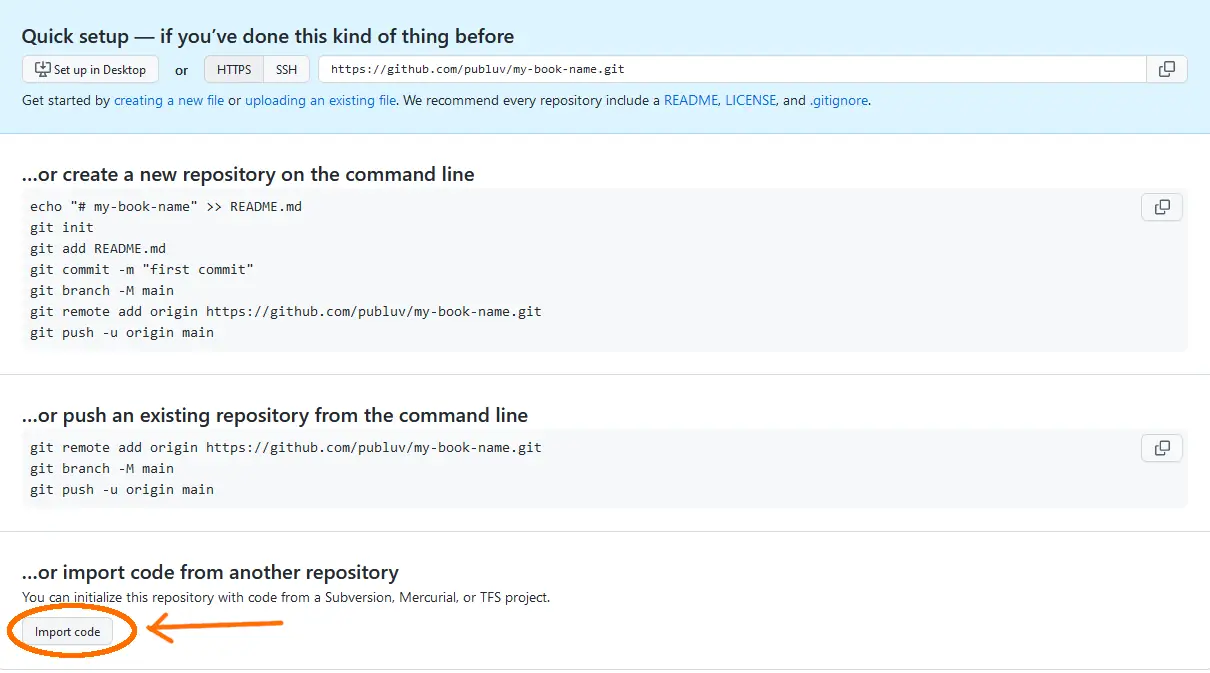
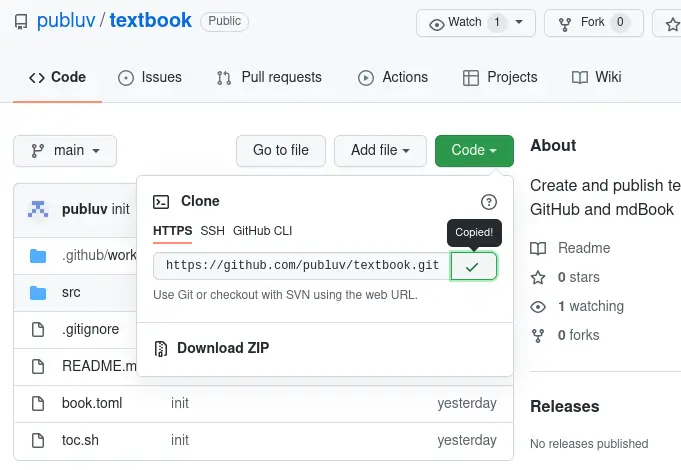
How to find a repository’s clone URL
Go to the repository page. Click on the Code button at the right end.
- Make sure the mode is set to HTTPS.
After all steps are completed, your repository should contain the same files as the original repository.
Create your first page #
For the mdBook framework, all pages of the book must go inside the src folder.
- Click on the
srcfolder - Go to Add File > Upload files.
- Name your file with a
.mdextension - Start typing Markdown into the editor.
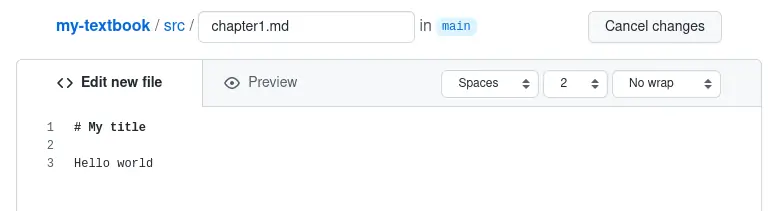
- When you’re done writing, select Commit directly to the
mainbranch and click the Commit new file button.
Create a folder #
To create a new folder:
- Select Create new file.
- In the
Name your filebox, type in your folder name and the first file:foldername/filename.md
Technically, GitHub does not host empty folders, so you need at least one file.
Upload pages #
If you have Markdown files on your computer, you can upload them to GitHub.
To upload a file, go to Add File > Upload files.

Uploading a folder #
Drag a folder from your file explorer into the box area.
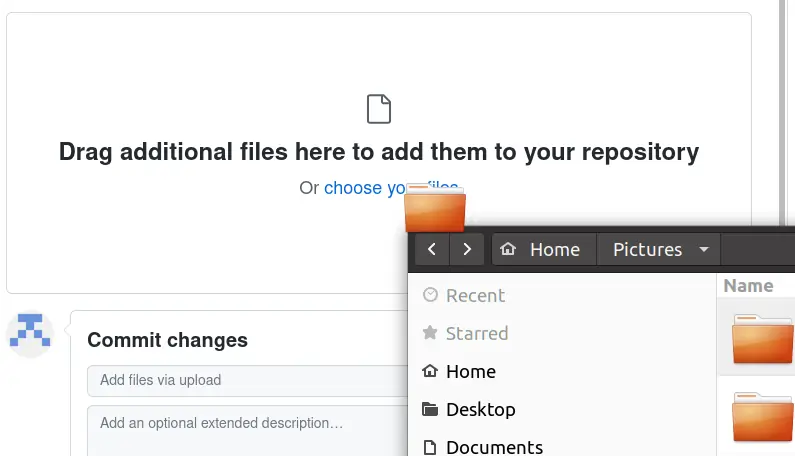
This will upload the entire folder to GitHub.
Arrange Table of Contents #
By default, the pages are ordered alphabetically and numerically.
- First-level pages are placed at the beginning, as frontmatter.
- The name of a first-level folder becomes the section title.
Example ToC and corresponding Folder Structure
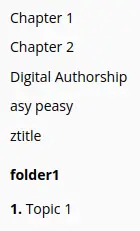
src/
├── chapter_1.md
├── chapter_2.md
├── digital-authorship.md
├── easy.md
├── folder1/
│   └── topic1.md
└── ztitle.md
Manually set order #
- Inside
srcfolder, create aSUMMARY.mdfile (must be all caps).
src/
├── SUMMARY.md
├── chapter_1.md
├── chapter_2.md
...- Follow the SUMMARY.md formatting guidelines.
Host your book on GitHub Pages #
GitHub pages is a free hosting service for simple websites.
Go to the repository Settings tab, then Pages on the left navigation menu.
If you’ve already committed changes, GitHub pages may be activated already! In that case, you can visit your website immediately.
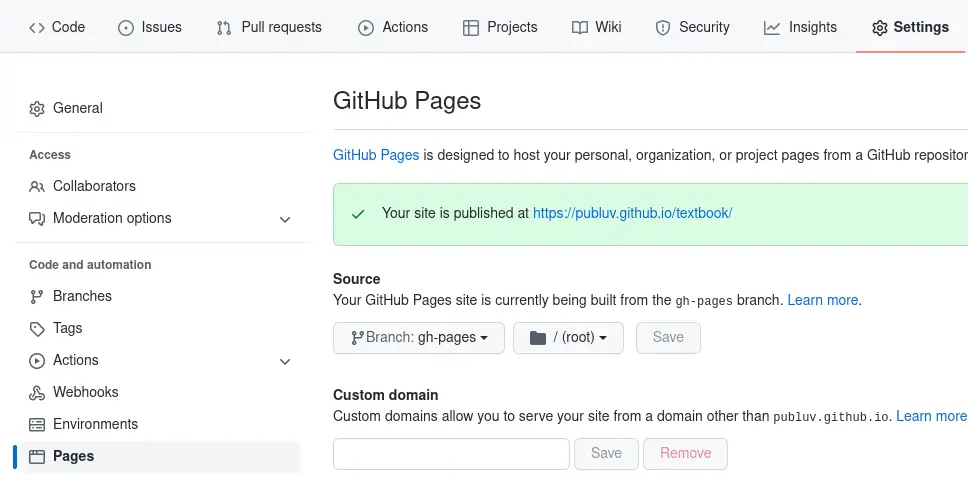
Otherwise, select the gh-pages branch and /(root) folder, then click Save. Wait a few minutes for the GitHub domain to propogate.
Branching with multiple collaborators #
When you have multiple authors and contributors, you might encounter merge conflicts. These happen because multiple people have edited the same file.
To encourage parallel development while dealing with merge conflicts, the main strategy is to make sure each contributor gets their own branch. A contributor is responsible for making sure they keep their branch updated with the latest version available, and to handle their own merge conflicts.
When you are about to commit a file, you can opt to Create a new branch for this commit and start a Pull Request. This option will create a new branch for you. You can make changes on this new branch without affecting the latest version.
To switch to a branch: 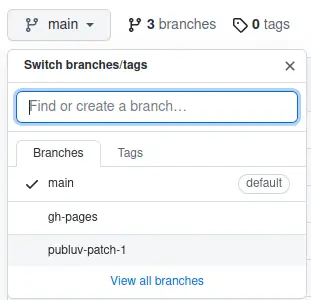
- Click on the branch menu, which has a pronged icon.
- Select the branch.
- Now that you are “in your own lane,” commit changes to your branch.
When you have multiple authors, it is easier for each author to work on their own branch.
You also want a reviewer who is responsible for the overall direction of the proejct. They are the ones who determine whether to merge changes into the main branch and finalize contributor content.
The concept of branching and Pull Requests takes some time to familarize with. If you are serious about collaborating on a complex document with multiple authors, try the GitKraken client to make it easier to sync repositories and track branches.
Takeaways #
This concludes the guide on how to freely host your own textbook, and also how writing in Markdown makes it easier to author and publish content.
Converting Markdown to another format, like HTML, EPUB, Word’s DOCX or InDesign’s ICML is predictable and consistent. If you start writing in Word, you cannot guarantee that you’ll keep your styles when you convert to HTML or EPUB, and publishing houses don’t want your custom styling anyway.
However, there’s a learning curve when it comes to data formats and all the ways you can self-publish. It’s perfectly fine to stick with mainstream tools such as Scrivener and MS Word.
Up next are topics related to internet and web publishing.
Open Access Movement #
According to the Universal Declaration of Human Rights:
Everyone has the right to education… Technical and professional education shall be made generally available and higher education shall be equally accessible to all on the basis of merit.
In academia, professors and researchers volunteer their time to peer review for journals. Peer review is considered a scholarly duty. No one is exempt from performing this act of community service if they want to advance their tenure and build up a reputation.
Then, journal publishers charge you to read scholarly submissions, regardless of which university you come from, or how many countless hours of free work you’ve offered.
Take a look at The Cost of Knowledge, a petition against shady and exploitative business practices damaging the scholarly community.
Sustainable Authorship #
The main premise behind sustainable authorship is to write each chapter of your book as a Markdown file (.md extension).
Markdown is a convention for quickly providing baseline styling. Markdown resembles early-internet text chat and the quirks that people used to decorate their text, such as using asterisks to denote *emphasis.* It is also commonly used in modern applications such as Reddit, Slack, Discord and MS Teams. Since Markdown is simple, it’s easier to convert Markdown to any other format, such as MS Word, InDesign, EPUB for ebooks, HTML, and PDF.
As an author, writing in Markdown alleviates you from formatting concerns. Authors should only be responsible for raw content, not fiddling with paragraph margins or the difference between hyphens and non-breaking dashes. Paragraph indents, page breaks, image inclusion and other such nuisances are a publisher’s responsibility. In fact, publishers want you to submit a manuscript as plain as possible, without any images embedded. They want images to be sent as a separate zip file. In your manuscript, you must reference image placement with some kind of syntax like:
<< photos/26.jpg >>
<< Caption: Toenail at 5000x magnification >>
A graphic designer will comb through the manuscript and insert images as they want.
In Markdown, there is already a syntax for referencing images:

If an editor reads this line, they would understand what you mean.
Authoring in Markdown #
While you can just write in Notepad and your default system text editor, there’s of other writing programs to use.
For example, Zettlr has:
- Export to Word and PDF
- Zotero integration
Further Reading #
Markdown is known for its ease of use. However, it has a tradeoff for being unable to represent complex tables.
LaTeX and other -TeX syntaxes exist to fill this gap of rendering complex figures for scientific papers. There are spin-offs of LaTex, like ConTeXt.
Here are links and articles about handling print output:
- Sustainable Authorship in Plain Text using Pandoc and Markdown
- Making an ebook — From Markdown to Kindle by David Grophland
- Convert Markdown to InDesign by Dr. Wouter Soudan
- Typesetting w/ Markdown and ConTeXt by Dave Jarvis
- AsciiDoc
- Convert Markdown to Shunn Manuscript format
Book generators in the wild #
Here are some generators specific to making book websites:
| Generator | Example |
|---|---|
| Bookdown An open-source R package that facilitates writing books and long-form articles/reports with R Markdown. | On The Line: How Schooling, Housing, and Civil Rights Shaped Hartford and its Suburbs by Jack Dougherty |
| Jupyter Used to create complex reports and notebooks for scientific research. | Principles and Techniques of Data Science |
| Markdeep Create a fully-rendered Markdown page by pasting a snipppet at the end of the file and giving it a .html extension. | Ray Tracing in One Weekend by Peter Shirley |
| mdBook Fast, cross-platform generator with a working theme out of the box. | The Rust Programming Language |
There are tons and tons of advanced generators, which are called Static Site Generators, available in any programming language.
Photo by Julia Volk