How to manually install Command Line Interfaces on Windows
Overview #
For an introduction to the command line and git, check out A CLI Intro Series – Part 1.
If you’re a writer/editor and wondering why the heck you should learn about CLIs, check out Vale, a programmable style guide.
This guide will explain how to setup a CLI tool on Windows 10. The intended reader is someone who is interested in automation or programming, but doesn’t know where to start. You should be familiar with navigating your filesystem, such as knowing how to open the Downloads folder, being able to see file extensions, and creating new directories.
Why manual installation?
Popular projects, such as Python, have “wizards,” installers, or distributions (such as Anaconda for Data Science) to complete these steps for you. However, there are many smaller projects that don’t have the time or resources to create installers.
Manual installation works for every program in existence, as long as the developers offer binaries for your operating system. The benefit of manual installation is that you know exactly what you’re downloading. If you want to store programs on an external drive, or you lack Admin access to a work computer, you can install simple utilities without needing permission.
Installing a program manually is as simple as unzipping a file, hence it’s sometimes called “zip” install.
Check your system type and if it’s 32- or 64-bit #
If your computer has been made within the last 10 years, it probably has a 64-bit processor. But, if you don’t know whether your computer is 32 bit or 64 bit, here’s an article on how to determine the version of your operating system.
Download the correct binary #
For the purposes of this guide, we are installing jq, a lightweight tool for manipulating JSON.
- Head to the jq “Releases” page on GitHub
- Download a file that matches your system. For Windows 64-bit:
jq-win64.exe - Create a new folder to store the program. For example:
C:\utilities\jq - Rename the executable to
jq.exe - Place it into your new folder
Naming conventions
“amd64” is the same as “x64” and “x86-64”. Anything with “64” in the name is for 64-bit.
“32-bit” binaries may be labeled “x86” (without mentioning 32)
Add the program to your Systems Environment Variables path #
After the program is extracted, you cannot call it from a terminal just yet. We have to add the location of our new program to a PATH list.
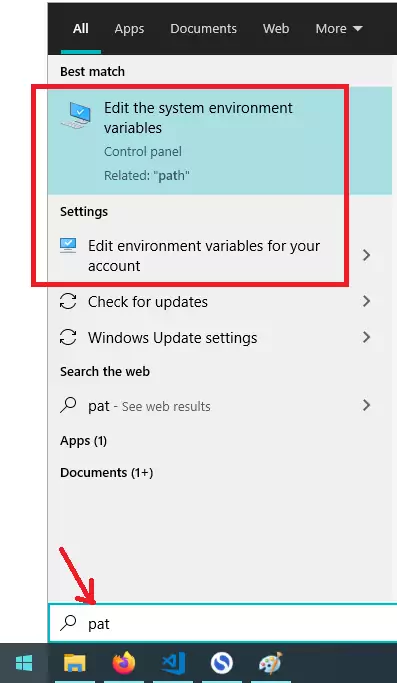
- Click on Start Menu and type
path(automatically pulls up Windows Search) - If you own the computer, choose “Edit the system environment variables”
- If you don’t have admin privileges, choose “Edit environment variables for your account” and skip to Step 4
 3. Click on [Environment Variables] 4. Under User variables for xxx, double-click on Path
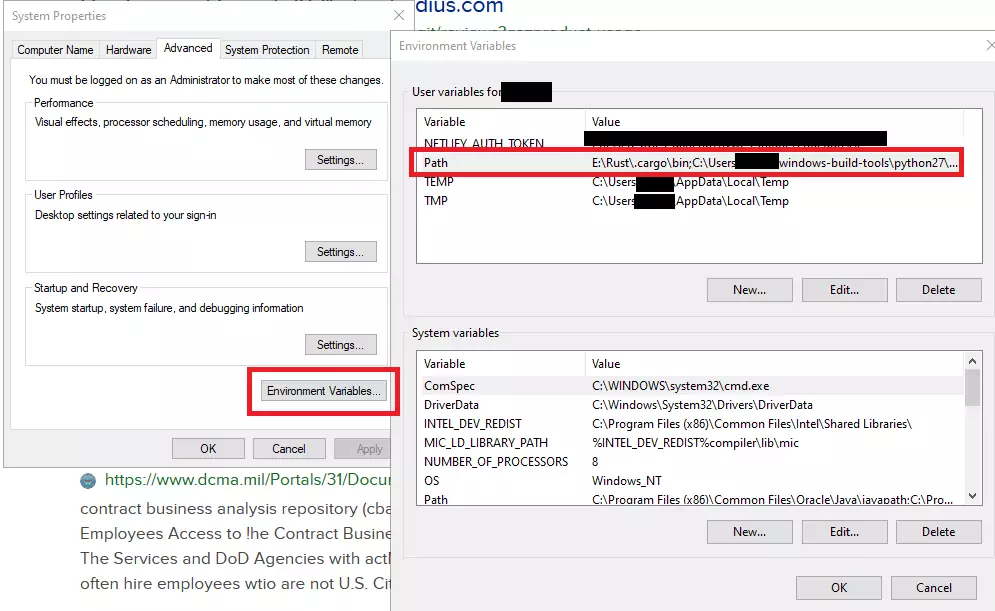 5. Click [Browse] 6. Find your directory where the program is stored, such as
 C:\utilities\jq
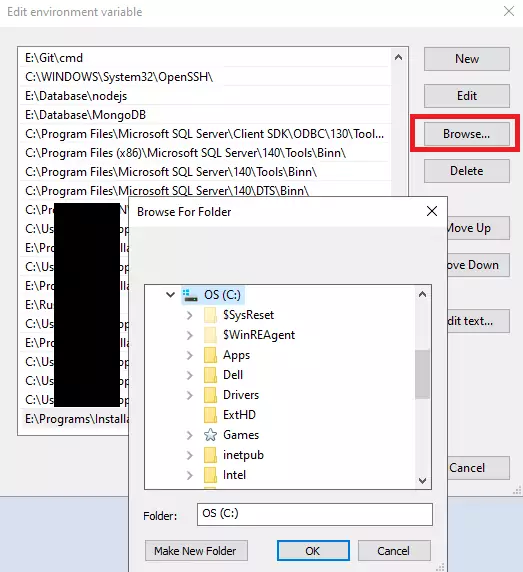
The OS
C:drive is typically under This PC
- Click [OK] on every window to save.
Check that the program runs #
- Start Menu > Type
cmd - Open “Command Prompt”
- Type in
jq --version - You should get a
jq-1.6response: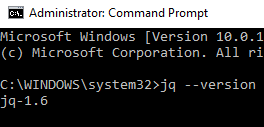
Because our program is called jq.exe, it can be evoked with a jq command. Likewise, a program named app.exe is called app in the terminal.
If you want to download multiple jqs, you can give them unqiue names and place them within the same folder. For example, if you download version 1.5 and 1.6 for testing purposes, rename the newer one to jq-1.6.exe, and you can evoke jq-1.6 --version.
After all steps are completed, you’ve installed a CLI manually and finished the tutorial!
Appendix #
Definitions #
Binary #
A binary refers to a file that’s ready to run on a machine (compiled to a machine-readable format), which is what most people know as program. Binaries for mobile devices are different from binaries for computers because they use different hardware, and the binaries for Mac OS are different from the binaries for Windows because the operating systems are coded differently.
As opposed to “building from source,” where you can download the human-readable source code, but to actually use the program, it needs to be compiled.
On Windows, binaries typically have a .exe or .bin extension. As always, only download from trusted sources. User discretion is the best antivirus.
Terminal #
It’s the black screen that you see in movies, when a hacker character conducts programming magic. In Windows, there are 2 different terminals: Command Prompt and PowerShell.
Before Graphical User Interfaces (GUIs), there was only text, so people typed their commands like how we type into calculators. Even nowadays, because text is easy to copy and transfer, and computers don’t need graphics, automation suites rely on terminal commands.
Every operating system comes with preinstalled scripts and programs. Here’s a list of Windows commands.
Due to the complexity of computers, the terminal has many other names, such as “console,” “shell,” and simply “command line”. Here’s an article about the origins of the terminal.
Intro to CLI Syntax #
As the field of computing evolved, programmers created the convention for POSIX-compliant syntax. This type of program is referred to as a Command Line Interface (CLI).
The format to evoke a CLI is as follows:
app command --flag argumentsappspecifies the program you want to usecommandcalls a particular function, although not all apps have commands. jq doesn’t use commands in its syntax, but git does.Flags are prefixed with two
--hyphens to indicate the full name of a flag, which is typically a true/false toggle, but again it depends on the program.One
-hyphen flags are aliases (1-letter shortcuts) because flag names get long and tedious to type out.- Aliases can be combined in one hyphen. For example, these two commands would run the same:
app --Version --verbose
app -Vvargumentsare independent inputs. Typically these will be a file or a string that you want to manipulate.
However, these are only conventions, so always read the documentation.
Interpreting documentation #
When reading the manuals of other programs, documentation for syntax usually is written out as:
app [options] arg1 arg2 … argN
Optional arguments and parameters are denoted inside square brackets []. Usually, there are examples to show the proper evocation and use cases.
Closing #
If you are interested in exploring CLIs further on Windows OS, I highly recommend installing PowerShell 7+ or activating the Linux Subsystem so that you can use Unix syntax. The Command Prompt and old versions of PowerShell use Windows-specific conventions, where the lack of cross-platform compatibility is annoying. Or, if you don’t want to download stuff, try remote computing with GitPod.